Enable SSL Connections to SQL Server
Sunday, February 03, 2013
“SQL Server Transport Encryption” is a good Google phrase for this technology.http://msdn.microsoft.com/en-us/library/ms191192.aspx
Obtain an SSL Certificate
A self signed certificate is easy and works fine... here’s one way:
Get the IIS 6.0 Resource Kit Tools: http://www.microsoft.com/download/en/confirmation.aspx?id=17275
All you'll need is the "SelfSSL.exe" tool so the custom install is minimal.
Find SelfSSL.exe in default install path: C:\Program Files\IIS Resources
Good reference for SelfSSL usage: http://www.sslshopper.com/article-how-to-create-a-self-signed-certificate-in-iis-7.html , scroll down to "Generate a Self Signed Certificate with the Correct Common Name"
Command line example:
SelfSSL /N:CN=MWR-TRO-V2 /V:1999999
The /V: part is the validity duration of your cert, in days. I believe 1999999 is the max, which corresponds to around 5475 years in the future (that ought'a last ya ;)
The /N:CN= part is the “Common Name” this cert will be tied to… in this case that needs to be the true machine name of your database server.
“Do you want to replace the SSL settings for site 1 (Y/N)?” => No
Now you have a cert registered in your “personal certificate store” - next we’ll extract it for installation on db server.
Fire up the MMC “Certificates Console” to manage your new cert
Good reference: http://support.microsoft.com/kb/276553)
Open the MMC console: Start > Run > mmc [enter] (or Windows-R) (MMC Fig.1)
Add the cert snapin: click File > Add/Remove Snap-in (MMC Fig.2)
select Certificates under Available snap-ins… and hit Add button… (MMC Fig.3)
select Computer Account… then Next… (MMC Fig.4)
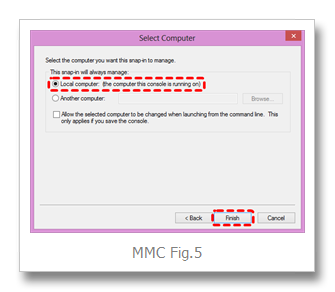
select Local computer, and then Finish… (MMC Fig.5)
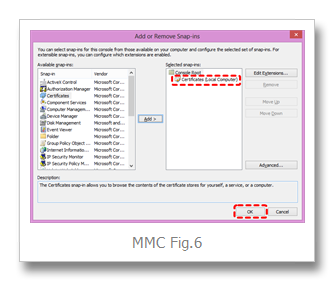
lastly, hit OK (MMC Fig.6)
You may wish to save this MMC configuration for future convenience (MMC Fig.7)
Export the cert as a pfx file
…to be installed on your database server
Certs installed via the above process will be your "Personal > Certificates" folder (Export Fig.1)
Right mouse desired certifcate > All Tasks > Export > Next ... (Export Fig.2)
“Export the private key?” => Yes … Next… (Export Fig.3)
Select PFX format, "Include all certs...", "Export extended", NOT “Delete…”, Next … (Export Fig.4)
Enter a password, hit Next… (Export Fig.5) – ** REMEMBER THAT PASSWORD **
Save the pfx file (Export Fig.6)
Finish… OK (Export Fig.7)
Import cert on database server
Login to your DB server desktop
Launch MMC Cert Console same as above
Go to Personal > Certs
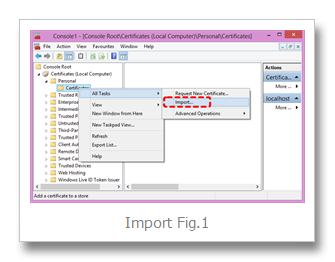
Right mouse All Tasks > "Import"… (Import Fig.1)
Next… (Import Fig.2)
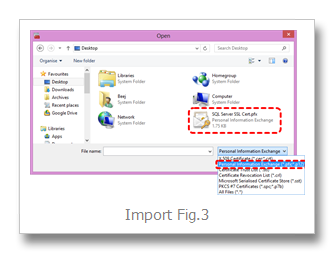
Browse… (Import Fig.3)
Next … (Import Fig.4)
Enter Password, select “Mark this key as exportable”, Next… (Import Fig.5)
“Place all certificates in the following store” => Personal… Next… (Import Fig.6)
Finish (Import Fig.7)
Activate SSL encryption on DB server
Fire up SQL Server’s Network Configuration Utility
Start > All Programs > Microsoft SQL Server {version} > Configuration Tools > SQL Server Configuration Manager"
then under "SQL Server Network Configuration"
Right click "Protocols for MSSQLServer"
select "Properties"
set "Flags tab > Force Encryption" to Yes
and select the installed cert on the "Certificates" tab
voila!
STOP AND RESTART THE SQL SERVER SERVICE
login to the instance with an SSMS Query window
fire this command to verify all connections are encrypted:
SELECT encrypt_option , * FROM sys . dm_exec_connections WHERE session_id = @@SPID
Tip: SP_WHO2 is handy for obtaining spids